Photos & Video for Sydney, Australia

Local Calls: 02 96984192

Photography Composition, With Overlay Examples

All You Need To Know About Photo Composition Techniques

Introduction to compositional rules and guidelines of photography

After taking more than 100 000 pictures we’ve used that knowledge to create this photography composition detailed guide. There are many examples to show you ‘how to’ and the ideas behind why they work for each element.

Improve your image taking knowledge by reading all the rules and examples to the end.

If you’re a beginner and just taking up photography for the first time, the first thing to know is that there are a set of rules that guide the composition of photographs, just as you’ll find with everything else.

These rules are certainly flexible, and most may not even apply in every situation. But, these rules are there to help streamline the process and help you produce better results.

These rules are called the “rules of composition”. If it helps, see them as a set of guidelines that’ll help make your pictures pop. Of course, when the occasion calls for it, don’t be afraid to discard them and be as creative as you like.

There are a lot of terms for new photographers to understand, if your unsure of these fundamentals; Depth of field, Shutter speed, Aperture, and Exposure. Check them out on the linked article. Otherwise read on about the fundamentals and 12 photo examples.

Photography Composition Example with Overlay

Example showing rule of thirds in an event photo 

Fundamentals of Composition

What are the elements of Composition in Visual Arts?

List of the Elements of Design are:

  • Line
  • Shape
  • Colour
  • Texture
  • Value
  • Form
  • Space

What is composition in photography?

In basic terms, composition simply identifies the arrangement of various elements in a scene within the frame.

Rules in photography that this article covers in great detail

List of the main Rules in photography

  1. Rule of Thirds
  2. Golden Spiral
  3. Golden Ratio
  4. Symmetry
  5. The Rule of Odds
  6. Triangular Composition
  7. Leading Lines
  8. Headroom
  9. Lead Room

There are quite a few of these rules or guidelines, but we’ll be placing the focus on “The Rule of Thirds”, because it’s a basic rule and because it’s one of the most widely used and understood rules for photographic composition.

The Rule of Thirds, What Is It?

The rule of thirds has been around since the 1700’s, that’s 3 centuries, and way before photography was accessible. It was, in fact, a ground breaking innovation when it was first introduced by creative painters all those centuries ago, yet it remains prominent to this day. It’s one of the first things you’ll learn when you venture into photography for the first time.

So, what is it?

We’ll explain the rule of thirds with a simple illustration.

To understand the rule of thirds and how you can apply it, imagine a picture as a movie. In every movie, there is a main character. But there are also other elements that help advance the plot of the movie, such as the settings and other characters.

Including these other elements in every scene will help provide insights to the storyline (and make the plot more engaging) in a way filling the entire screen with the lead character never could.

Having some empty, supporting or negative space in the frame forces the viewer to search for the main subject. It is this eye hunting we do naturally that make images more interesting. The photo holds your attention longer, provokes deeper thought.

“It is where art meets technical guidelines”

That’s a rough word sketch of the idea behind the rule of thirds. The rule of thirds can be a lot of things, but at the heart of it, it simply discourages placing your subject at the centre of your photograph, design, painting, or film.

It emphasizes creating a visually balanced image that amply represents your point of interest not by superimposing it at the centre of the image but by subtly withdrawing it, letting the other elements around it do the highlighting.

“In a way, the rule of thirds is a way to bring your subject into focus by placing it off focus”

This method works because when you expand the scene of an image, it infuses that image with a pleasing aesthetic balance. In the eyes of the viewer, it also tells a more complete story.

Rule of thirds is simple

Remember that just because the rule of thirds is so simple and works so well doesn’t make it the be-all-and-end-all of photographic compositions [Wikipedia]. To begin with, it’s not actually a rule; it’s more like a guideline.

Naturally, photographers have the prerogative to ignore this rule in their creative pursuits. Also, bear in mind that there are several other rules, some of which we’ll be discussing later on in this article.

Before that, let’s examine the practical applications of the rule of thirds and how it works.

How Does The Rule Of Thirds Work?

Now, for the conventional definition of the rule of thirds. The rule of thirds is a compositional guideline that proposes the division of pictures into nine equal segments with two vertical and two horizontal lines.

The aim is to position the essential elements of the scene on (or as close as possible) to the points where the lines intersect on the left and right sides of the frame. Placing your point(s) of interest along these points of intersection is a surefire way to create more tension, energy, and interest in the composition, according to the experts.

What is a simple explanation of the rule of thirds for photography?

The rule is simply explained as an even horizontal and vertical grid of 9 sections.

Let’s not complicate a simple concept.

That brings us to the question of what a point of interest is, and how to identify it.

Understanding Points of Interest

Before you even think about applying the rule of thirds, you need to know what a point of interest is.

Sticking to the movie illustration we used earlier, you may think of a point of interest as the lead character in a movie. In other words, it’s the element that you consider central to your composition. It’s the feature that you want to beam the spotlight on.

Most times, you already know your point of interest in a scene before you even raise a camera to your eye.

There are also times when you need to look beyond the big picture to identify essential points of interest nestled within the scene.

Before taking the shot, you’d also need to consider the role your point of interest plays in the context of the full picture, and how it interacts with the rest of the image.

Points of Interest in Portrait Photography

Regardless of whether you’re taking headshots or portraits of people that are still or capturing pictures of people moving in or towards an area such as at an event.

There are important points of interest that can help you apply the rule of thirds better. The eyes should be the number one point of interest if you’re taking a portrait.

When photographing individuals, it is standard practice to align the person’s body with a vertical line and the person’s eyes with a horizontal line.

When shooting a moving subject, you should follow the same pattern, with the majority of the additional space placed in front of the subject; the space that they’re interacting with.

Similarly, when photographing a still subject who is not directly facing the camera, the majority of the additional space should be in front of the subject, with a vertical line running across their apparent centre of gravity.

Practical Use of The Rule of Thirds

In theory, the rule of thirds is very easy to apply when composing an image. Simply align your point of interest to any of the areas where the vertical and horizontal points intersect and you’ve got a picture to rival the classics.

In reality, it’s a bit more complicated than that, particularly for beginners who may have trouble mentally dividing the frame into nine equal parts.

Luckily, most photography equipment these days, including iPhones, come with the option to enable a gridded overlay in the viewfinder.

This effectively removes a major obstacle, helping you develop your skills till you get to the point where you can delineate the lines and gauge the composition by eye.

If you’re using a camera that doesn’t offer that option, you’ll have to play it by ear and develop your skills as you go through the age-old method of trial and error.

Remember, artists in the 18th century did not have the benefit of that same option, still, they did alright, by our estimation.

Does The Rule of Thirds apply to Event photography composition?

It certainly does apply to event photography as the human eye and perception does not change whether you are photographing static (still life) or with motion and dynamic subjects that live events have.

Great event photographers need to not only master static photography, like a gala ballroom table setting but also be able to work with and apply the main photography rules of composition on the fly and under variable low lighting conditions.

A few examples of the rule of thirds and Golden spiral being applied for event photography below.

Photography composition at events have a lot more variables. Rules do not apply all the time, for instance at Cocktail parties and media walls.

Off centre photos do not look good whereas centred photos do.

Use your judgement and viewer expectations as a guide too.

Event photography examples of the Rule of thirds

Any type of occasion where people gather and are able to move around presents the photographer with ample opportunity to practice the art with the rules in mind.

On the fashion runway photo example we may or may not have had the chance to capture the image at exactly the grid intersect but in post you can trim a little to place the focus subject exactly where you, the artistic creator chooses. As your can see on the grid overlay, spot on the rule of thirds.

Rule of Thirds Event photography with grid overlay
Rule of Thirds Event photography

Rule of thirds in corporate event photography. Both top and bottom grids are on two important element in this photo. The name of the event and the participating speakers.

Balance and focus on the important elements of the event where you can.

Portraits of People using The Rule of Thirds

The rule of thirds is useful in practically all photography genres, applications and situations, including landscape photography, portrait photography, wildlife photography, events and architectural to name a few.

In portrait photography, you should, in general, place the subject’s body along a rule of thirds grid line. Also, remember that the eyes are the points of interest when photographing people in portrait mode. Align the eyes over one of the top points of intersection.

For the stage event photo example we’ve bent the rule as it is more important to not miss the moment of the performer on stage. It is less than perfectly aligned to a rule (which is a guideline) is better than not getting the shot at all. Preference is to place the grid intersection over the nearest eye.

The portrait photo of the DJ with arms wide wearing the Freedom shirt still looks great. This photo also has plenty of Lead Room. More on that later in the post.

This might not always apply when capturing tight headshots and portraits. But certainly it is useful when the person is not filling the full frame such as below.

Apply the same rule when capturing people interacting with other elements in their immediate surroundings.

You can place your point of interest (your focus person or people) at the bottom intersection points either to the left or right of your frame. And let the scene expand for a more balanced, aesthetically pleasing, and dynamic picture. We use this a lot in event photography too.

Portraits at Events Using The Rule of Thirds Composition overlay

Portrait photo of a DJ on stage. Combining both the portrait and event elements. On this photo we’ve bent the rule of thirds as this moment only lasted a second or two.

Getting the shot at a live show is more important than missing one trying to get everything to be perfect.

Even with some post production cropping, cropping the hand out was not an option as it is important part for the shot to have impact. Bend the rules when needed.

Bending The Rule of Thirds photo event example Grid
Wedding Portrait Rule of Thirds photo example with grid overlay

Wedding Portrait Rule of Thirds photo overlayed example.

On this photo example we were able to get the grid intersect where we wanted. Usually it is on the nearest eye but in this case we like the focus where it is best.

Stay flexible with all the rules and guidelines in photography.

The photographer is the creator of the art, don’t let the rules rule your artistic expression.

Example of Rule of thirds in Architecture photography

Rule of Symmetry, Triangles and Rule of Thirds being utilised all at the same time in an Architecture photo demonstrating good Composition.

Rule of Symmetry, Triangles and Rule of Thirds in Architecture Composition

Examples of Rule of Symmetry in Interior Architecture

Rules of Symmetry Composition Architecture Photography

Rule of Symmetry and Balance in Interior photography demonstrating good pleasing Composition.

Example photo of Symmetry and Balance

Rule of Symmetry and balance in this retail interior décor photo being utilised. Photo rules and guidelines are used a lot in Interior architecture photography to demonstrating good Composition.

Symmetry Interior Composition example

Applying Rules in Landscape Photography

Another area where the rule of thirds can be employed to dramatic effect is in landscape photography.

To take a landscape photograph using the rule of thirds, align the horizon line with the intersection point’s bottom third, subtly drawing attention to the sky above.

Next, align the horizon along the upper third of the image to pull the attention to the foreground and create a sense of intimacy with the scene.

To establish a point of interest in the image, place a natural element such as a rock, natural feature or a waterfall on one of the four grids. This also works really well with a person.

Practical Advice on Using The Rule of Thirds

The rule of thirds is best understood and honed by repeated, practical application.

When you put yourself in situations where you can practice constantly, the grid lines and their intersecting points will become imprinted in your brain.

In the meanwhile, here are some photographic suggestions from working pros to help guide your experimenting.

  • Start Simply: Don’t try to take on too much, too soon.
  • Start by practicing with your camera or phone’s rule-of-thirds grid. It’ll help you see what you’re doing until you get to the point where you can mentally visualize the lines.
  • Go out and take pictures: Take a trip somewhere with your camera and capture several images that observe the rule of thirds model.
  • Pick your point of focus before you shoot: Settle on your point of interest first. If you’re photographing humans or animals, the eyes will do just fine.
  • Practice in city scapes, landscapes or even at home on still life objects.
  • Assess your results in your favourite processing software on your computer with a large screen.
  • Switch on the grid overlay and see which looks better to you. The ones that line up nicely with the grid points or off grid centres?
  • Take more photos with the research you’ve done and refine where necessary.

Breaking The Rule of Thirds

Rules are made to be broken, bent and adjusted to suit your artist instincts. In any case, the rule of thirds, despite its nomenclature, is not a rule that’s been cast in stone, as we keep emphasizing.

There are instances where your composition will be better if you simply ignored the rule of thirds and went with something more suited to the situation. A very good practice is to learn and practice the rule of thirds until it becomes second nature, then actively look for situations where it can be broken.

If your subject will only form a small part of the picture, you can break the rule of thirds and place it at the centre of the photo.

Depending on the situation, that may be the only way to highlight it. This happens more than you might think.

You can also break the rule of thirds when photographing symmetrical subjects or ones with repetitive patterns, when placing them dead centre makes them more captivating.

Finally, don’t forget that it’s possible for pictures to both obey and break the rule of thirds at the same time.

Share This Story to Socials

Break the Rules whenever you like

As we keep saying, all the photography composition rules aren’t rules, they may just be guidelines so feel free to place your main focus in the centre such as this photo of models in a catwalk line.

Looks good to us in the centre and has a pleasing Composition.

Breaking the Rule of Thirds Guidelines

Other Composition Principles and Techniques (Part 1)

The rule of thirds may be the most popular rule of composition, but it’s far from the only one. Here, we’ll discuss some other widely-used rules or guidelines.

List of all the additional Rules in photography

  1. Golden Spiral
  2. Golden Ratio
  3. Symmetry
  4. The Rule of Odds
  5. Triangular Composition
  6. Leading Lines
  7. Headroom
  8. Lead Room

Golden Spiral

The Golden Spiral, or the Fibonacci Spiral, is named after Leonardo Fibonacci, a 12th-century mathematician.

Fibonacci discovered a series of numbers that, when divided against each other, produce a number very close to 1.618, long considered to be the natural number.
The Fibonacci Spiral is the name given to this pattern.
He’s had an effect on modern photography without knowing it.

The “Fibonacci Spiral” was made by connecting squares with Fibonacci numbers, with the length of each square being a Fibonacci number. The spiral is said to be everywhere in nature, most notably resembling the shell of a nautilus.

A set of diagonal points on each square will then provide a route through which the spiral can move. Using the spiral as a technique to create a photograph allows the spectator to be guided naturally around the image.

The Fibonacci spiral, along with the “Phi Grid”, forms the bases of the Golden Ratio.

Golden Ratio

The Golden Ratio is another composition guide that’s been in existence for several decades, even predating the creation of modern cameras.

It’s based on the ratio of 1 to 1.618, an equation so unique that it’s said to be ingrained in nature itself, from the DNA of human beings to the striking physical composition of sunflowers.

In art, the Golden Ratio has been used by several historic figures, and some of the most notable man-made monuments on earth have been built according to it.

Beethoven is said to have used the ratio in the composition of his famous fifth Symphony, while other notable artistic works such as the Mona Lisa, The Birth of Venus, and The Last Supper are said to have been based on the Golden Ratio.

The Golden Ratio provides for a perfectly balanced composition from the standpoint of the spectator, resulting in an image that is attractive to the human eye.

We naturally like to gaze at images that are balanced and harmonious, which the Golden Ratio delivers.

Using the Golden Ratio as a design element in photography is an excellent approach to produce a powerful composition naturally.

This will entice people to look at your images and keep them interested from the start. The Golden Ratio will also direct the reader around your image in a roundabout way.

Symmetry

Humans are naturally attracted to things that are well-balanced and harmonious. Understanding the impact of symmetry on the human psyche can help you make powerful and evocative statements from the simplest minimal photos.

When elements of your composition mirror other sections of your composition, you have symmetry.

When two parts of your scene seem the same and balance each other out, you get this effect. Symmetry is defined as something clean, proportionate, and balanced, and it makes images look nice, orderly, and precise.

List of the Types of Symmetry

  1. Horizontal Symmetry: This occurs when the line delineating your scene travels from the left to the right, dividing it into equal parts.
  2. Vertical Symmetry: On the other hand, if the scene is divided into two identical halves from top to bottom, you have vertical symmetry.
  3. Radial Symmetry: Radial symmetry is a type of symmetry in which the sides are aligned around a central point. Many flowers are symmetrical in all directions. The floral architecture of the petals is nearly identical. Also used in architectural photography for spiral staircases and features.
  4. Reflective Symmetry: Reflective symmetry, as the name implies, is all about reflections. Water, surfaces such as glass, and structures all have reflections. This one is used a lot in black and white street photography.

Examples of Golden Spiral Ratio with overlay

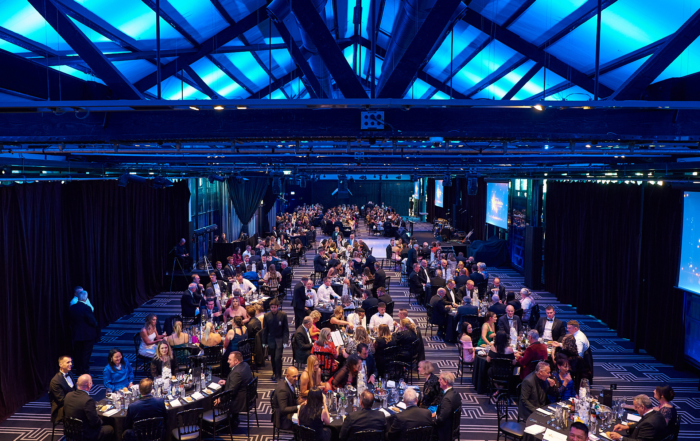
Golden ration highlighting the type of corporate event which was a Gala dinner awards ceremony.

Then draws the eye down to the table setting which gives is more supplementary context and finally around to the room to complete the picture that tells a story.

Rule of Thirds Event photography
Golden Spiral Rule event photography

For those of you who are reading this article in full will notice this is the same image as above. Occasional you can get both the rule of thirds and the golden spiral / ratio applying to the same picture.

If you are trying to highlight the Event itself. Then this photo also has the golden ration placement focussed on the name. Then draws the eye down towards the people, then to the tail of the golden spiral on to the sponsors list.

Other Composition Principles (Part 2)

The Rule of Odds

The brain has been naturally hardwired to recognize and create order.

The rule of odds exploits this tendency of the brain’s to create visually and aesthetically striking compositions.

The rule dictates that compositions should, as much as possible, contain an odd number of objects rather than an even number.

When applying this rule practically, your photo should contain three people instead of two, or five fruits rather than four.

The idea behind this is that a single odd item may become the dominant one since the arrangement has successfully routed the brain’s instinct to group items in pairs. The brain would be forced to look longer.

You should be careful when applying the rule of odds in your compositions.

The brain can count up to 8 objects individually when they appear in a photo. Any more and the brain treats the whole thing as a group.

This means that three, five, and seven objects will produce the desired results. As soon as you exceed the highest of those numbers, all bets are off.

Examples of this are for light poles in a streetscape. Or the number of piers at dock and in nature such as the three sisters peaks in the Blue mountains would look very different if there were four.

Side note, there are actually four but the last one is very small so it doesn’t detract the eye from the attractiveness of the rule of odds.

Triangular Composition

Triangular Composition is similar to the rule of thirds; it’s actually a variation of it. In this instance, instead of dividing the photo by straight lines, triangles are used.

Why triangles? Triangular formations have long been used by artists to create visual drama. However, artists aren’t the only ones who employ triangles.

Photographers have also used the form extensively to add emphasis, direct the eye, and accentuate lively angles emerging inside the camera frame. Triangles are an excellent tool for integrating several compositional methods, such as lines and pathways, to produce a more intriguing element of an image.

Types of Triangles

What are Implied Triangles?

Implied triangles are delicate subject matter groupings that give the idea of a triangular composition.

Implied triangles aren’t just one type of triangular topic. Instead, they take cues from many components in an image to create a triangle-like layout.

What are Self-contained Triangles?
These are triangles that are ever-present in our natural environment.

Are Triangles used in portrait photography?
Yes triangles are used a lot in portrait photography. A model’s arm slightly bent form a triangle. A foot on toes forms a triangle inside and outside the legs. The curves from the angles shoulders and hips form another triangle at the waistline.

A triangle helps grab the eye and holds your attention longer in models with triangular shaped body angles than without in many instances.

Leading Lines

Simply put, a leading line is a line in a photograph that has been composed specifically by the photographer to lead the gaze or focus of the viewer to a predefined point of interest.

Leading lines are effective because humans naturally have this instinct to follow lines and pathways, to see where they lead.

Leading lines can be very effective at directing attention away from elements of the photograph you’d prefer your viewers not to see and drive their gazes to those areas you want them to see. This technique is very useful, particularly in the hands of savvy photographers.

List of the 4 Types of Leading Lines

  1. Horizontal lines
  2. Vertical Lines
  3. Diagonal lines
  4. Converging lines

Simple example of Leading Lines in Landscape photography

A simple example of Leading Lines in Landscape photography. No overlay on this one as the image itself has multiple leading lines.

Whether your eye is drawn from the top down or bottom up matters not. The important part is that the natural leading lines encourage the viewers eye to scan the photo.

Simple Leading Lines in Landscape Photography Composition

Other Compositional Principles (Part 3)

Headroom

Headroom simply refers to the space between the top of your (human portrait) subject’s head and the top of the frame.

While this might look like one of the least important factors in the search for the perfect composition, it shouldn’t be totally ignored.

It’s important to get just the right distance if you don’t want your picture to end up on the wrong scale of two extremes, where there’s either too much space or too little space.

The quantity of headroom necessary is determined by how near your subject you are. The closer you zoom in, the less space you should allow.

This may seem a little hazy, but that’s because there are no hard and fast rules for obtaining the proper amount of headroom. Simply be aware of it before pressing the shutter, and recompose the image until the headroom no longer catches your attention – that’s when you’ve nailed it.

One tip is to take the shot slightly zoomed out and crop in post production and see which looks ‘better’ or pleasing to you.

Lead Room

Lead room is another compositional technique whose roots can be traced to painting.

Also known as nose room or leading space, lead room refers to the space ahead of where the subject in a photograph is facing. Lead room helps make pictures aesthetically appealing and well-balanced.

Breaking the rules when it comes to lead room can have negative consequences for your composition. It can make the photo look and feel cramped and also add tension, leaving the viewer with an uncomfortable feeling.

In event photography where you have a lot of people moving around this is very important. Events such as weddings, concerts and sporting events. Lead room can make or break your photo.

In A Nutshell

Creativity, in whatever form, is said to work best when given free rein, unfettered by any consideration that might restrict its flight.

That’s why it feels like such a contradiction providing a wide range of rules meant to govern such a creative pursuit as photography.

Far from trying to muzzle your creativity, these rules (they aren’t really rules anyway) are there to help you on your way to producing enchanting and spellbinding compositions.

In this article, we’ve discussed a many of these rules and how mastering them can help improve the quality of your compositions exponentially.

Take them literally or take them at arm’s length but one thing we encourage you to do is practice the art form of photography.

Whether as a hobby, as therapy or as a profession, always enjoy honing your craft.

Share This Story to Socials

Articles to read next
Corporate Event Photography Sydney

Corporate events such as awards, gala dinners, conferences, ceremonies, plenaries, workshops and product launches, plus more.

Professional Portrait in Sydney Photo. By Photographer orlandosydney.com

Portrait Photography in Sydney, North Sydney & CBD. Individuals, Couples & Families. Outdoors in your home or office.

Professional Headshot Photography Sydney

Corporate headshots will accelerate the careers of woman and men in business. Be authentic, be current, be the influencer.

Free Photographer Brief Templates

Photography Brief Ideas and Templates. All you need to know for small and large events both indoors and outdoors.

It takes less than 30s & it’s free
2024-01-23T08:19:44+11:00